Payroll Settings
These settings be set up first before using the Payroll feature in the system. It is important as it determines important items that are used within Payroll. These settings can only be edited by Admin or any other assigned employees.
- Accessing the Payroll Settings
- Payroll General Settings
- Overtime Rate
- Additional Remuneration Type
- Deduction Type
- BIK/VOLA Type
- Contribution
Accessing the Payroll Settings
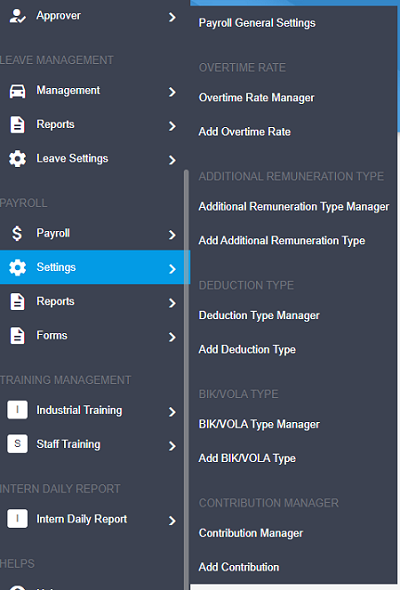
To access this feature, go to the Sidebar menu, go to Payroll, hover over Settings, then click whichever function you wish to access to. You will be able to see the following functions in the menu as shown in the picture below.
Payroll General Settings
Click on Payroll General Settings to access the page. The following image will display the form.
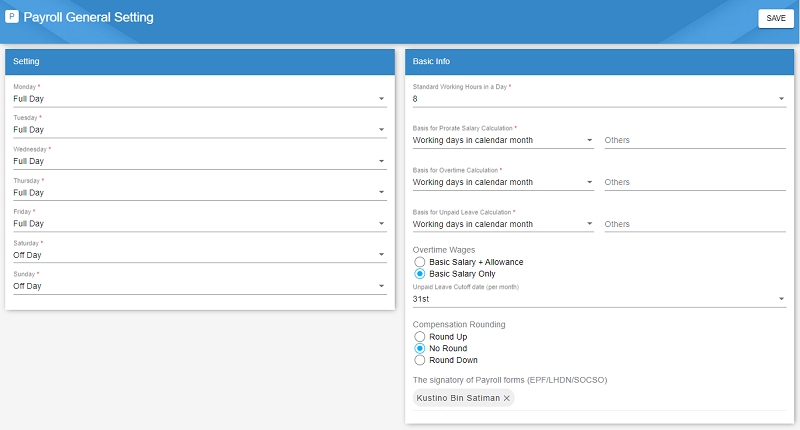
Below are the details of the settings that can be set here.
| Settings | Description |
|---|---|
| Working days (week) | Sets the working status for each day of the week. There are 3 statuses, Full Day, Half Day and Off Day. |
| Standard working hours (day) | Sets the number of working hours in a day. |
| Basis for Prorate Salary Calculation | Sets the basis (number of days in a month) for prorate salary calculation in the payroll. Read more on the Types of Basis. |
| Basis for Overtime Calculation | Sets the basis (number of days in a month) for overtime calculation in the payroll. Read more on the Types of Basis. |
| Basis for Unpaid Leave Calculation | Sets the basis (number of days in a month) for Unpaid Leave calculation in the payroll. Read more on the Types of Basis. |
| Unpaid Leave Cutoff Date | Sets the date (1-31) when the Unpaid Leave is cutoff from being used in the payroll. If the Unpaid Leave exceeds the cutoff date, the Unpaid Leave will be added to the next month's payroll. |
| Compensation Rounding | Sets the rounding off for the compenstation given to the employee. |
| Signatory of Payroll Forms | The signature of the employee set here will be used in the payroll forms such as EA Tax Form. |
Types of Basis
The types of basis listed below are used in the Basis for Prorate Salary Calculation, Basis for Overtime Calculation and Basis for Unpaid Leave Calculation.
every day in calendar month- if a month has 31 days, then 31 is used for the calculation, it changes depending on the month
working days in calendar month- if a month has 31 days, and there are 5 working days per week, then 25 days is used for the calculation (also changes depending on the month)
other fixed days- state the number of days in the form field.
Editing the Payroll General Settings
By default, the settings have been added to the system. To edit any of the default settings, change any of the form fields then click the Save button on the top right.
Overtime Rate
The Overtime Rate is the rate set for an employee's overtime. To access it click on the Overtime Rate Manager in the Sidebar menu. Below is the image of the Overtime Rate Manager.

Overtime Rate Manager
The Overtime Rate Manager is able to manage any of the Overtime Rate added to the system. By default, 3 Overtime Rates namely Normal, Rest Day and Public Holiday are added to the system.
The following table will list down in details, the functions of the icon buttons that you can see in the table.
| Icon Button | Function |
|---|---|
Links to the edit page to edit the Overtime Rate. |
|
Opens up a confirmation popup. Click the Delete button to confirm your deletion of the Overtime Rate. |
To search for a specific Overtime Rate, click on the Searchbar, then type the Title.
Adding an Overtime Rate
To add in an Overtime Rate, click on the Add Overtime Rate button in the Overtime Rate manager or access it through the sidebar menu by clicking on Add Overtime Rate.

Fill in the Title and the Rate for the pay. For example, if the rate is set to 1.5, the employee who worked overtime will get 1.5 of their pay per hour. Once done adding all the required information, click Save.
Additional Remuneration Type
Additional Remuneration is the additional amount that can be added to the employee's payroll for example a Bonus. To access it click on the Additional Remuneration Type Manager in the Sidebar menu.
Additional Remuneration Type Manager
The Additional Remuneration Type Manager is able to manage any of the Additional Remuneration Type added to the system. By default, some types are already added to the system. The manager will display all the Additional Remuneration Types in the system as shown in the picture below.
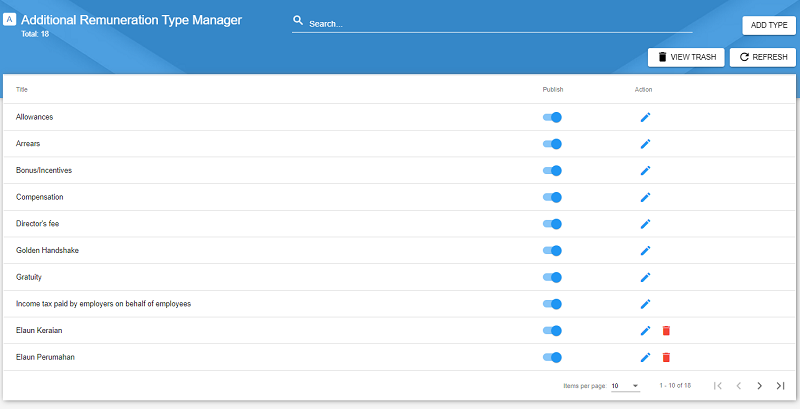
The following table will list down in details, the functions of the icon buttons that you can see in the table.
| Icon Button | Function |
|---|---|
Links to the edit page to edit the Additional Remuneration Type. |
|
Opens up a confirmation popup. Click the Delete button to confirm your deletion of the Additional Remuneration Type. Function not available for default Additional Remuneration Type. |
The search function is available by clicking on the Searchbar, then typing the Title.
Adding an Additional Remuneration Type
To add in an Additional Remuneration Type, click on the Add Type button in the Additional Remuneration Type Manager or access it through the sidebar menu by clicking on Add Additional Remuneration Type.

Fill in the title and select whether it is subjected to any tax, EPF, SOCSO or EIS. It is possible to select zero or more for the subjected to. Once done, click Save.
Deduction Type
Deduction Type is a type of deduction that the employee can have in their payroll. An example of Deduction Type is Advanced Pay. To access it click on the Deduction Type Manager in the Sidebar menu.
Deduction Type Manager
The Deduction Type Manager is able to manage any of the Deduction Types added to the system. By default, 2 Deduction Type namely Advanced Pay and No Pay Leave are added to the system.
The following table will list down in details, the functions of the icon buttons that you can see in the table.
| Icon Button | Function |
|---|---|
Links to the edit page to edit the Deduction Type. |
|
Opens up a confirmation popup. Click the Delete button to confirm your deletion of the Deduction Type. |
To search for a specific Deduction Type, click on the Searchbar, then type the Title.
Adding a Deduction Type
To add in a Deduction Type, click on the Add Deduction Type button on the top right of the Deduction Type Manager or access it through the sidebar menu by clicking on Add Deduction Type.

Fill in the title, select zero or more of the subjected to. The Deduction Type may be subjected to either tax, EPF, SOCSO and EIS.
BIK/VOLA Type
The BIK stands for benefit-in-kind while the VOLA refers to Value of Living Accomodations. The BIK/VOLA type is a combination of these two. To access it click on the BIK/VOLA Type Manager in the Sidebar menu.
BIK/VOLA Type Manager
The BIK/VOLA Type Manager displays all the BIKs and VOLAs that are listed within the company. To access this page, click on BIK/VOLA Type Manager in the sidebar menu. The following image displays the BIK/VOLA Type Manager.
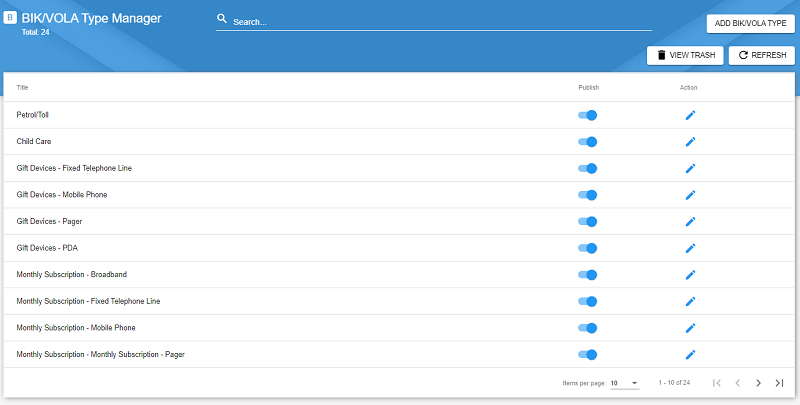
The following table will list down in details, the functions of the icon buttons that you can see in the table.
| Icon Button | Function |
|---|---|
Links to the edit page to edit the BIK/VOLA Type. |
|
Opens up a confirmation popup. Click the Delete button to confirm your deletion of the BIK/VOLA Type. |
The Search function is available by clicking on the searchbar, then type the Title.
Adding a BIK/VOLA Type
To add in a BIK/VOLA type, click on the Add BIK/VOLA Type button in the BIK/VOLA Type Manager or access it through the sidebar menu by clicking on Add BIK/VOLA Type.
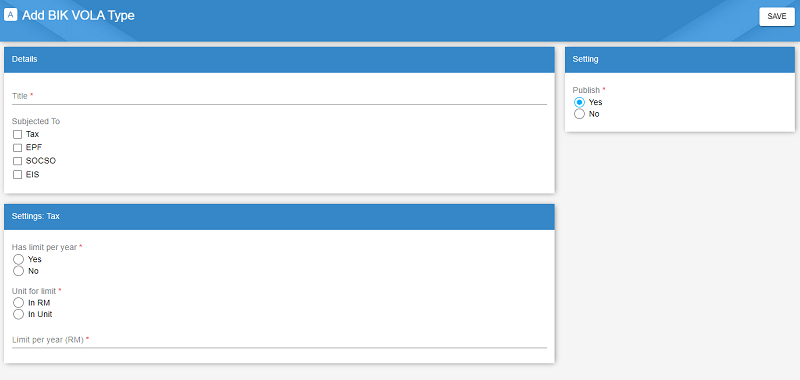
Fill in the title, select the subjected to, and set if there is any has limit per year. If yes, choose the unit for limit. There are 2 choices, In RM and In Unit. Once the unit for limit is chosen, type in the limit per year depending on the unit of limit that was chosen.
For example, if the title is smartphone and there is a has limit per year. If in RM, the limit per year can be 1500.50. If in Unit is chosen instead, the limit per year can be 1 unit (which refers to one smartphone for example).
Contribution
Contribution refers to the contribution the employee has to pay to the statutory bodies such as EPF, SOCSO and etc.
Contribution Manager
The Contribution Manager displays a list of contributions available in the system. By default, a few contributions were added to the system, for example EPF(9%) and EPF(11%). To access it click on the Contribution Manager in the Sidebar menu. The image below displays the Contribution Manager.
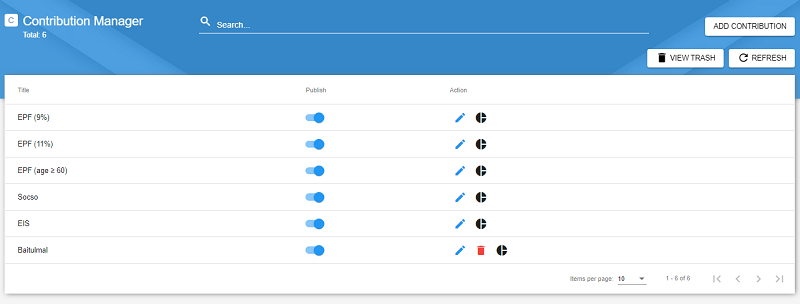
The following table will list down in details, the functions of the icon buttons that you can see in the table.
| Icon Button | Function |
|---|---|
Links to the edit page to edit the Contribution. |
|
Opens up a confirmation popup. Click the Delete button to confirm your deletion of the Contribution. The delete function is not available for default Contribution. |
|
Links to the Contribution Rate Manager. |
The search function is available by clicking on the searchbar and typing the Title.
Adding a Contribution
To add in a Contribution, click on the Add Contribution button in the Contribution Manager or access it through the sidebar menu by clicking on Add Contribution.

Fill in the Title then select the Category. Click Save.
Contribution Rate Manager
The Contribution Rate Manager displays the rates of the selected contribution available in the system. There will be ranges of the monthly salary and their respective employee and employer contribution rates. The image below displays the Contribution Rate Manager.
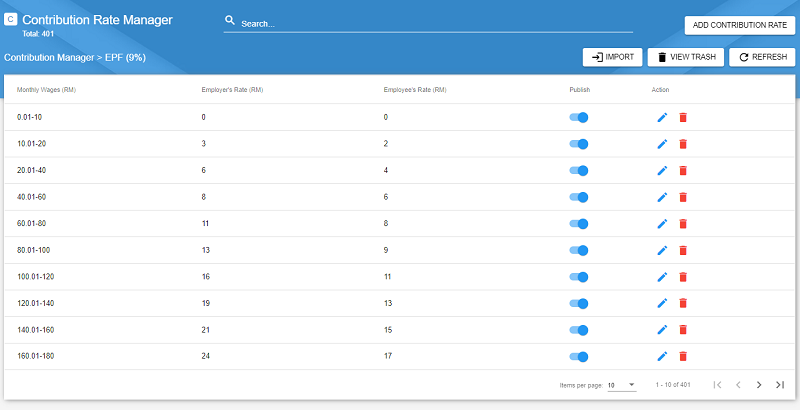
Adding a Contribution Rate
To add in a Contribution Rate, click on the Add Contribution Rate button in the Contribution Rate Manager.

Fill in the From Amount in RM (in numbers, eg. 20000.00) then fill in the To Amount in RM. If the To Amount has no limit to it, fill in -1. Next, fill in the employer's rate and the employees' rate. Click Save.
Importing Contribution Rates
Adding in contribution rates one by one can be a lengthy process. To add in multiple contribution rates, click on the Import button in the Contribution Rate Manager. Once clicked, you will see a popup appear as the image below.
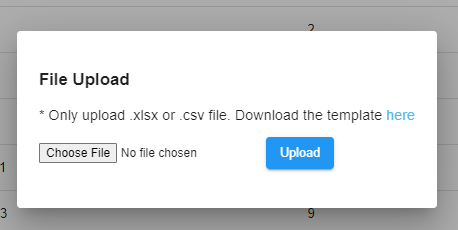
Download the template provided by clicking on the highlighted here. The template will look as follows:
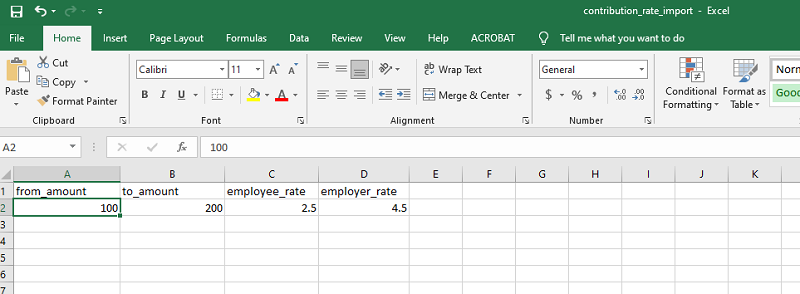
Fill in all the from_amount, to_amount, employee_rate and employer_rate. Then save the excel. In the File Upload popup, click Choose File and select the excel that was just filled in. Then click the Upload button. The contribution rates listed in the uploaded file will be uploaded into the system.