Payroll
This is one of the important features of the system. The Payroll module assigns a payroll to an employee. Here, you can set the details of each employee's payroll and customize it according to their needs.
The following tutorial will be labelled with
Accessing the Payroll HR
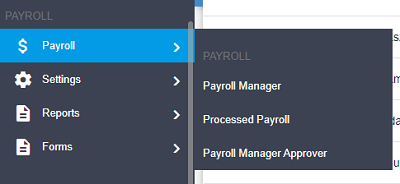
To access this feature, go to the Sidebar menu, go to Payroll, hover over Payroll. You will be able to see a list of functions as displayed in the picture below. Depending on your role, the list of functions may differ.
Payroll Manager HR
The Payroll Manager displays all the employees' payrolls within the company.
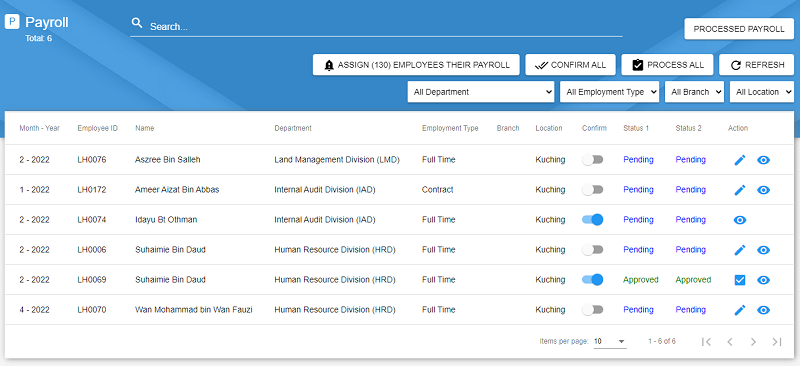
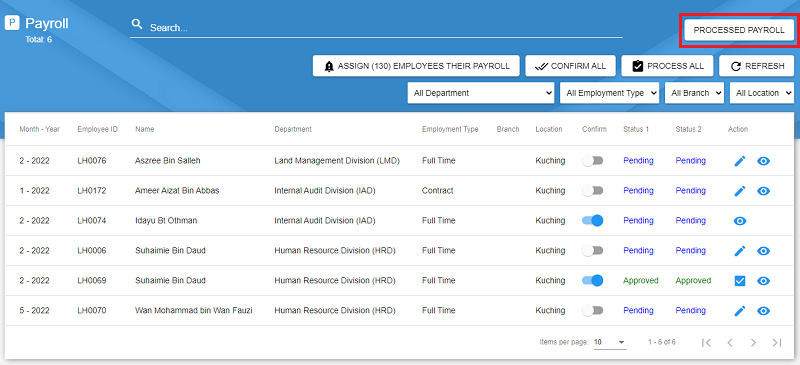
The table below gives a summary on the buttons available in the manager and their respective functions.
| Button | Function |
|---|---|
| Processed Payroll | Redirects to the Processed Payroll Manager |
| Assign (number) Employees Their Payroll | Redirects to a form to assign an employee to a payroll. Read more in Assign an Employee Payroll |
| Confirm All | Confirms all the filtered payroll listed in the table |
| Process All | Processes all filtered payroll. Once processed, the payroll will be under Processed Payroll Manager |
| Refresh | Refreshes the data in the table |
The following table will list down in details, the functions of the icon buttons that you can see in the data table.
| Icon Button | Function |
|---|---|
| Confirms a single payroll. Payrolls should only be confirmed after the payroll is completely edited | |
Links to the edit page to edit the Payroll. Will be hidden once the payroll is confirmed |
|
| Processes a single payroll. Will only appear after the payroll is approved and confirmed | |
| Opens up a popup to view the details of the payroll |
Assigning an Employee Payroll
This is the first step to create the employee's payroll. To assign an Employee a Payroll, click on the Assign Employees Their Payroll button as shown in the picture below.
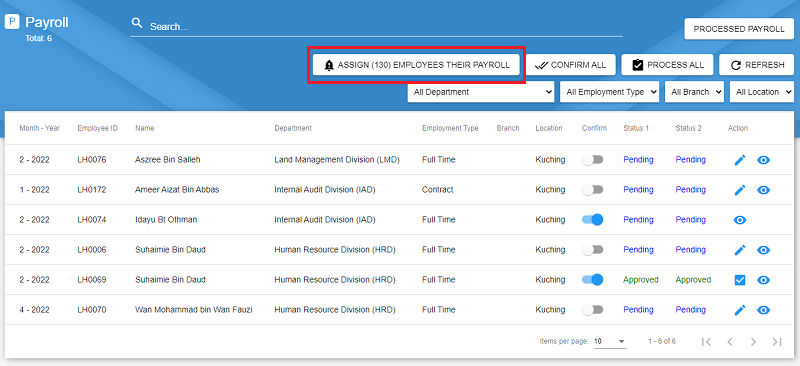
It will redirect you to a form to assign the employee their payroll. Select the employee's name then select the tax category.
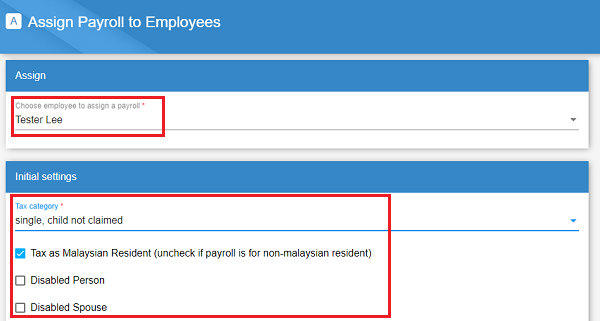
If there are any number of children claimed, you may fill in based on the children characteristic and age followed by the percentage claimed (50% or 100%). By default, all the values are set to 0.
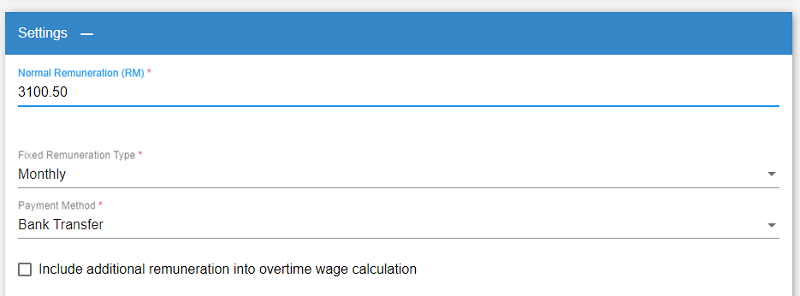
In the Settings card, type in the basic salary of the employee under Normal Remuneration. Select the Fixed Remuneration Type and Payment Method. If the additional remuneration is used for overtime calculation, you may check the checkbox.
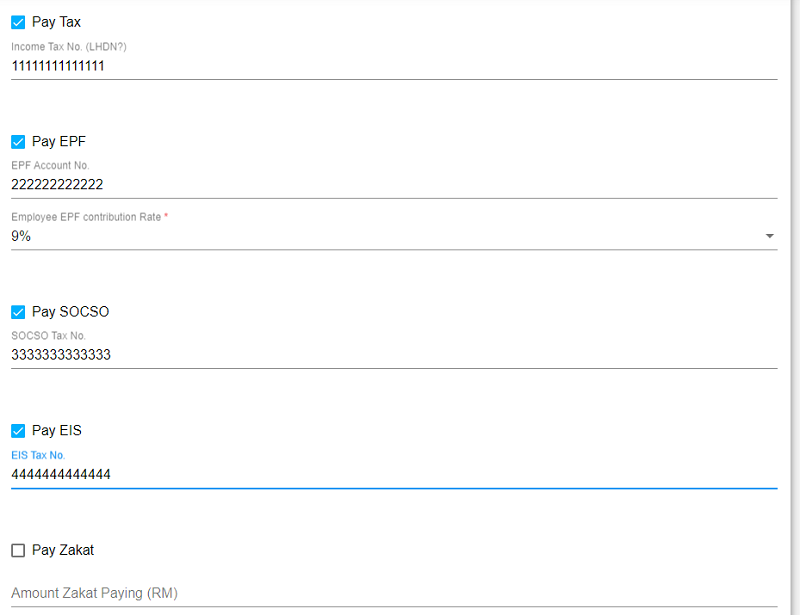
For the rest of the form fields, check them if the assigned employee is applicable to it. For example, if the employee is applicable to pay EPF, check the Pay EPF form field, type in the EPF Account No. then select the EPF contribution rate.
Once all the required fields are filled in, click on Save.

{warning} The
Normal Remuneration (RM)field only accept numbers and the symbol.. For example, 3500.50 is the accepted format while 3,500.50 is the wrong format.
Searching and Filtering Payroll
To search for a payroll, click on the searchbar and type in the employee's name as shown in the image below.

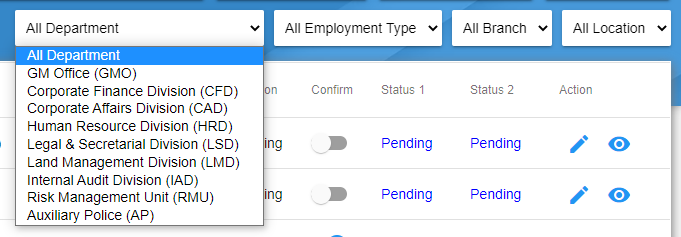
To filter records, use the dropdown on the right side of the Manager. You can filter the data by any of the filters available.
Viewing a Payroll
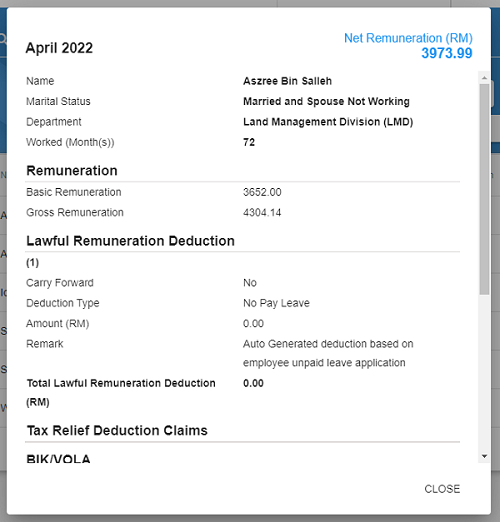
To view the payroll details, click on the
Editing a Payroll
Once a payroll has been assigned to an employee, the payroll can be edited to add in additional information such as their additional remuneration. To edit a payroll, click on the
The form is separated into several tabs for easier viewing and editing as shown in the image below. The current tab that is opened is highlighted in blue.

Tab 1 : Remuneration
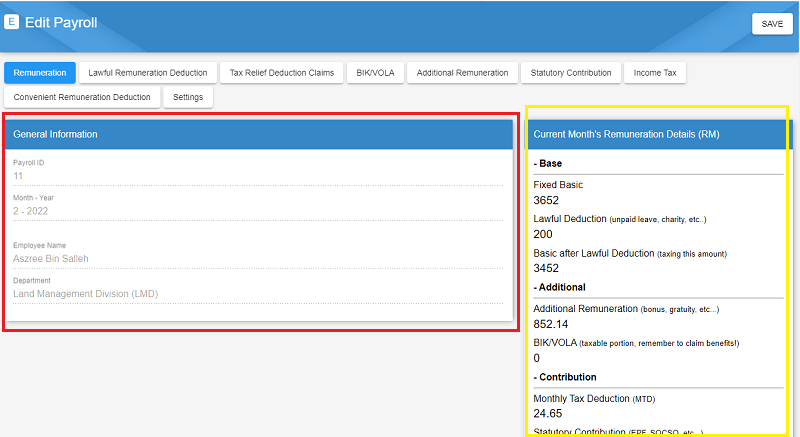
The Remuneration tab consists of 2 cards, namely General Information and Current Month's Remuneration Details (RM).
The General Information which is highlighted in the red rectangle displays the general information(eg. payroll month, employee's name) of the employee's payroll.
The Current Month's Remuneration Details (RM) which is highlighted in the yellow rectangle is a summary of the details(eg. total additional remuneration, gross wage, statutory contribution) in the payroll.
Tab 2 : Lawful Remuneration Deduction

Lawful remuneration deduction refers to the amount of money that will be deducted from an employee's salary. The Lawful Remuneration Deduction tab consists of 2 parts, namely Lawful Remuneration Deduction and General Details.
The General Details card displays the total lawful remuneration deduction within the payroll.
The Lawful Remuneration Deduction is the form field to add in any lawful remuneration deductions in the payroll if it exists. To add in a lawful remuneration deduction, click on the + Add Lawful Remuneration Deduction button as shown in the image below.

Once clicked, a card will appear for you to fill in the details. Select the deduction type from the dropdown then fill in the amount in RM. If there are any remarks, you may fill in the remark field. If the lawful remuneration deduction is recurring(repeats), you may check the recurring checkbox.
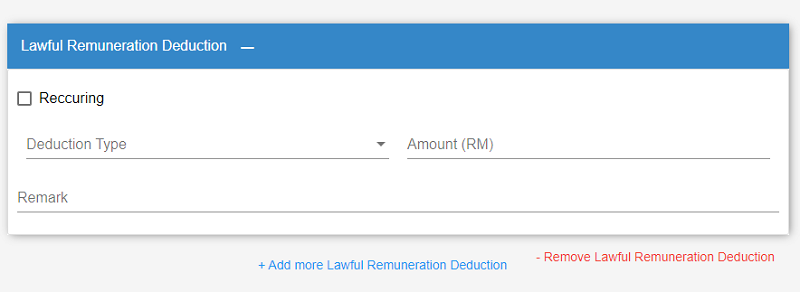
To add in another record for lawful remuneration deduction, click on the + Add More Lawful Remuneration Deduction button as shown in the red rectagle. Another card will appear for you to fill in more of the lawful remuneration deduction.
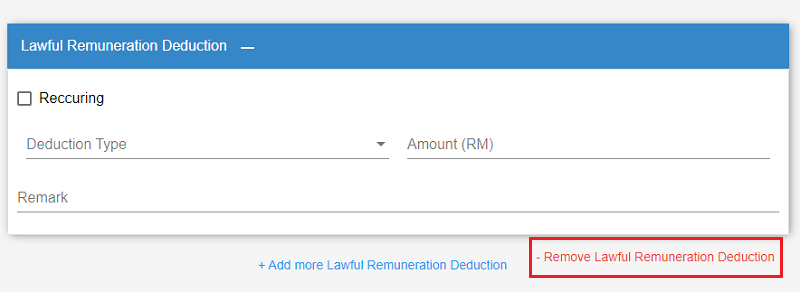
To remove the lawful remuneration deduction, click on the - Remove Lawful Remuneration Deduction button.
Tab 3 : Tax Relief Deduction Claims

Tax relief deduction is the deduction that is able to reduce the chargeable income and hence reduce the employee's tax. This tab focuses on the information for tax relief deduction. To add in a tax relief deduction, click on the + Tax Relief Deduction Claims button as shown in the red rectangle.

Once clicked, a card will appear for you to fill in the details. Select the type from the dropdown then fill in the amount in RM. If there are any remarks, you may fill in the remark field. If the tax relief deduction claims is recurring(repeats), you may check the recurring checkbox.
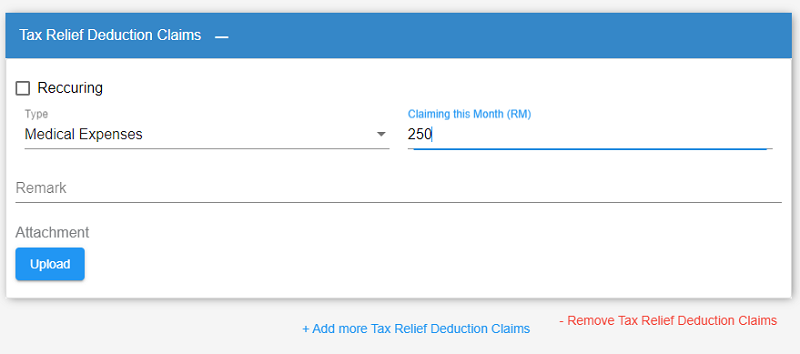
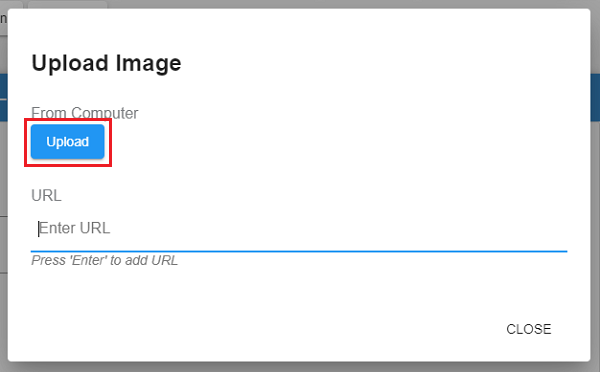
You may also upload any attachments as proof by clicking on the Upload button. A popup will appear, click on the Upload button then choose any images from the file explorer. Once its successfully uploaded, you can exit the popup by clicking on the Close button.
To add in another record for tax relief deduction claims, click on the + Add More Tax Relief Deduction Claims button. Another card will appear for you to fill in more of the lawful remuneration deduction. To remove the tax relief deduction claims, click on the - Remove Tax Relief Deduction Claims button.
Tab 4 : BIK/VOLA
BIK stands for Benefits-in-Kind while VOLA stands for Value of Living Accomodations. This tab is for adding any details regarding the BIK/VOLA into the employee's payroll.This tab consists of 2 parts, namely BIK/VOLA and General Details.

The General Details card displays the total BIK/VOLA within the payroll.
The BIK/VOLA is the form field to add in any BIK/VOLA in the payroll if it exists. To add in a BIK/VOLA, click on the + Add BIK/VOLA button as shown in the image below.

Once clicked, a card will appear for you to fill in the details. Select the BIK type from the dropdown then fill in the amount in RM. If there are any remarks, you may fill in the remark field. If the tax relief deduction claims is recurring(repeats), you may check the recurring checkbox.
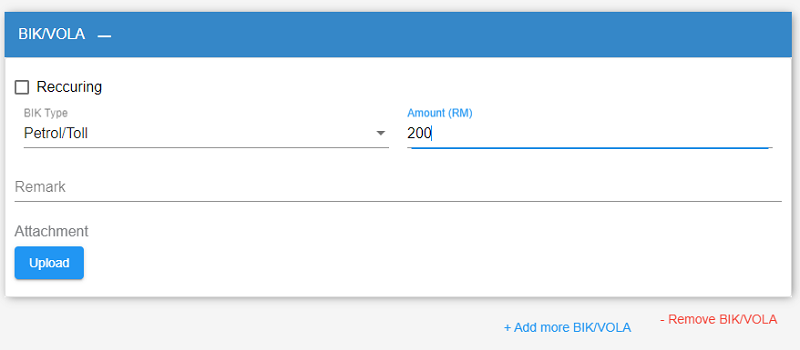
You may also upload any attachments as proof by clicking on the Upload button. A popup will appear, click on the Upload button then choose any images from the file explorer. Once its successfully uploaded, you can exit the popup by clicking on the Close button.

To add in another record for BIK/VOLA, click on the + Add More BIK/VOLA button. Another card will appear for you to fill in more of the lawful remuneration deduction. To remove the BIK/VOLA, click on the - Remove BIK/VOLA button.
Tab 5 : Additional Remuneration
Additional remuneration is the additional amount of money an employee receives for example their bonus, allowance or overtime. This tab focuses on adding these information into the employee's payroll. It consists of 3 parts, namely Additional Remuneration, General Details and Overtime Remuneration.

The General Details card displays the total Additional Remuneration within the payroll.
The Additional Remuneration is the form field to add in any additional remuneration in the payroll if it exists. To add in a Additional Remuneration, click on the + Add Additional Remuneration button as shown in the image below.

Once clicked, a card will appear for you to fill in the details. Select the Additional Remuneration type from the dropdown then fill in the amount in RM. If there are any remarks, you may fill in the remark field. If the additional remuneration is recurring(repeats), you may check the recurring checkbox.
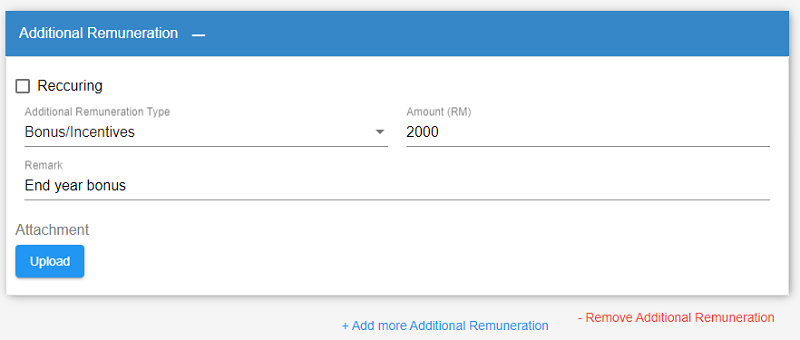
You may also upload any attachments as proof by clicking on the Upload button.
To add in another record for Additional Remuneration, click on the + Add More Additional Remuneration button. Another card will appear for you to fill in more of the additional remuneration details. To remove the Additional Remuneration, click on the - Remove Additional Remuneration button.
To add in any overtime pay, click on the + Add Additional Overtime Remuneration button as shown in the red rectangle below.
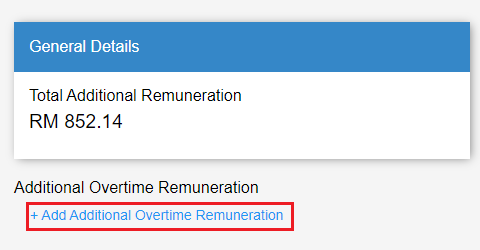
Once clicked, a card will appear for you to fill in the details. Select the overtime rate from the dropdown then fill in the hours worked. Then, click on the Calculate Overtime button as indicated in the image below. The amount will be automatically calculated and displayed once its clicked.
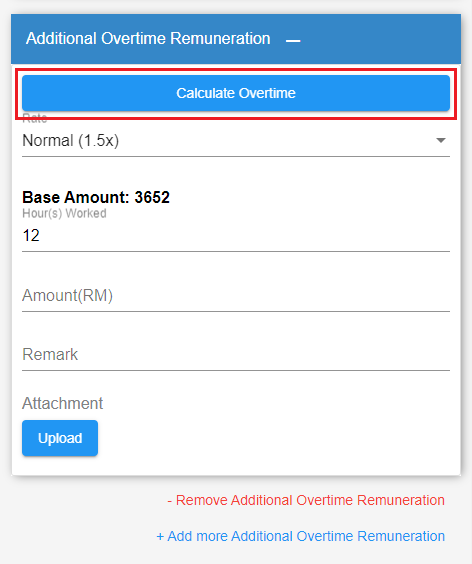
If there are any remarks, you may fill in the remark field. You may also upload any attachment by clicking on the Upload button.
To add in another record for Overtime Remuneration, click on the + Add More Additional Overtime Remuneration button. Another card will appear for you to fill in more of the overtime remuneration details. To remove the Overtime Remuneration, click on the - Remove Additional Overtime Remuneration button.
Tab 6 : Statutory Contribution
Statutory Contribution refers to the contributions made to statutory bodies such as EPF, EIS, SOCSO and etc. This tab consists of 2 parts, namely Statutory Contribution / Deductions to taxable portion of income (RM) and General Details.
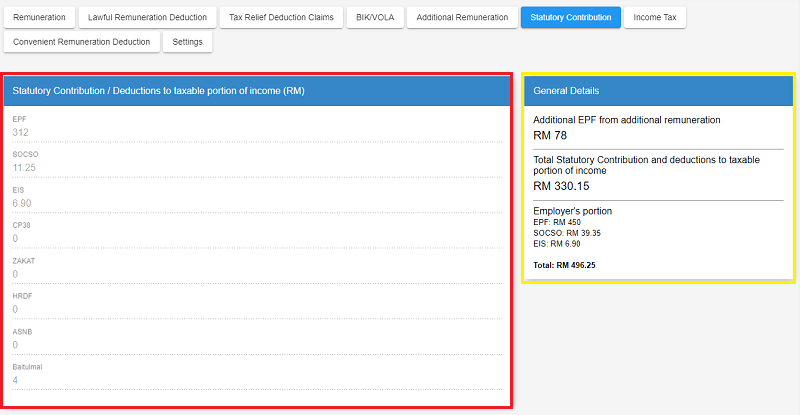
The Statutory Contribution / Deductions to taxable portion of income (RM) displays the amount provided to the statutory bodies for the current month's payroll.
Meanwhile, the General Details provides a summary of the statutory contribution, such as the additional EPF from additional remuneration, the total statutory contribution and deductions taxable portion to the income and the employer's contribution to the statutory bodies.
Tab 7 : Income Tax
The Income Tax tab shows the values of the MTD calculated from the payroll and the yearly tax. It also displays the initial settings when the employee is first assigned to the payroll.
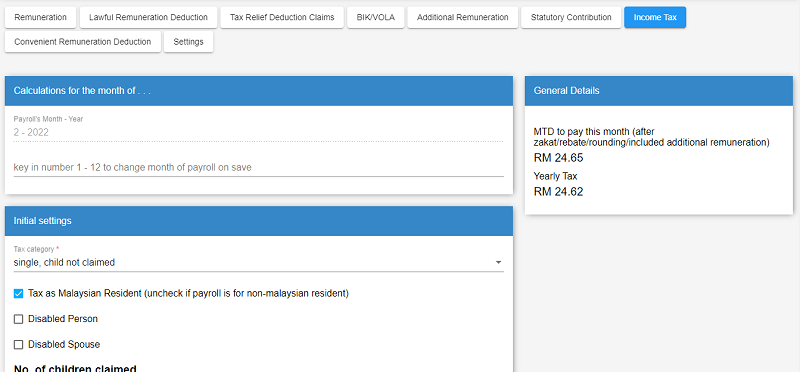
In the Calculations for the month of . . . card, you may add in any number from 1 - 12 in the form field to change the payroll's month upon saving.

The General Details card displays the current month's MTD to pay and the yearly tax.
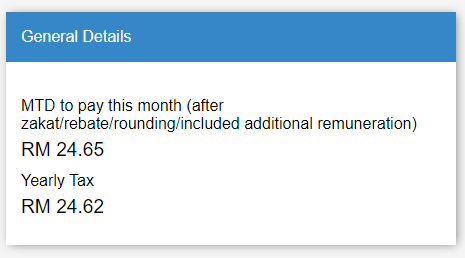
The Initial Settings card is similar to the settings set when assigning an employee to a payroll. To edit any of the initial settings, you may change the values here. For a breakdown on the fields and how to fill this part of the form, refer to Assigning an Employee Payroll.
The Accumulations (NOT including current month) card displays the accumulated remuneration, MTD, statutory contributions, tax reliefs claimed and etc.
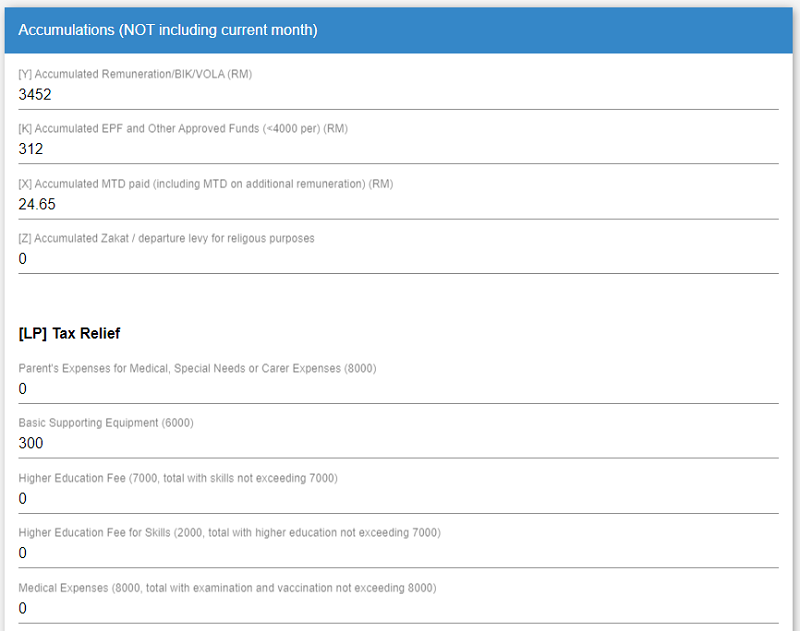
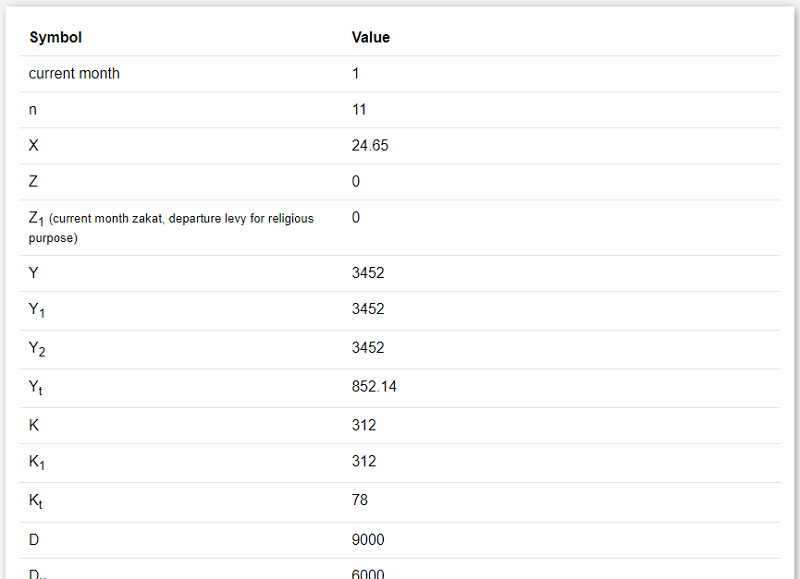
The table card in this tab displays the symbols and the values of the MTD calculation based on the MTD formula excluding the current payroll's month values.
Tab 8 : Convenient Remuneration Deduction
The Convenient Remuneration Deduction is a tab to add in any deductions the employee has without affecting the MTD calculation. To add in a Convenient Remuneration Deduction, click on the + Add Convenient Remuneration Deduction button.

Once clicked, a card will appear for you to fill in the details. Type in the name of deduction and the amount in RM. If there are any remarks, you may fill in the remark field. If the convenient remuneration deduction is recurring(repeats), you may check the recurring checkbox.

To add in another record for Convenient Remuneration Deduction, click on the + Add More Convenient Remuneration Deduction button. Another card will appear for you to fill in more of the convenient remuneration deduction details. To remove the Convenient Remuneration Deduction, click on the - Remove Convenient Remuneration Deduction button.
Tab 9 : Settings
The settings tab is a tab to edit the settings of the employee's wage and their statutory contributions. For a breakdown on the fields and how to fill this part of the form, refer to Assigning an Employee Payroll.
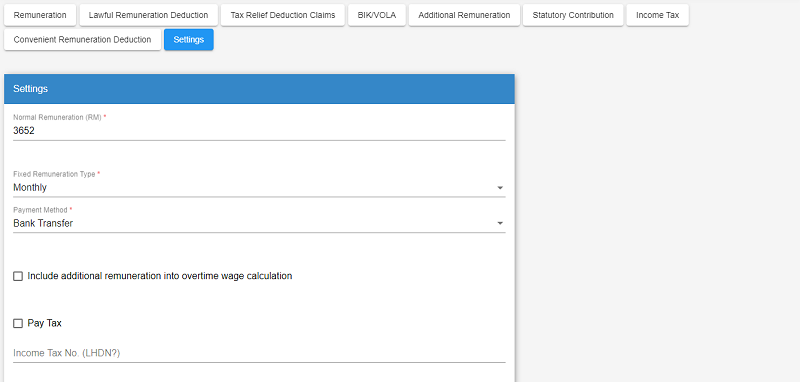
Once all the fields in each tabs are filled properly, click on Save at the top right to save the payroll details as shown in the image below.

Confirming a Payroll
If the payroll has been completely edited and there will no longer be any changes, the payroll is considered to be Confirmed. To confirm a payroll, click the Confirm column of the data table.

{primary} A blue
(toggle button) indicates that the payroll is confirmed. Otherwise, if its gray in colour, the payroll is not confirmed yet and can still be edited
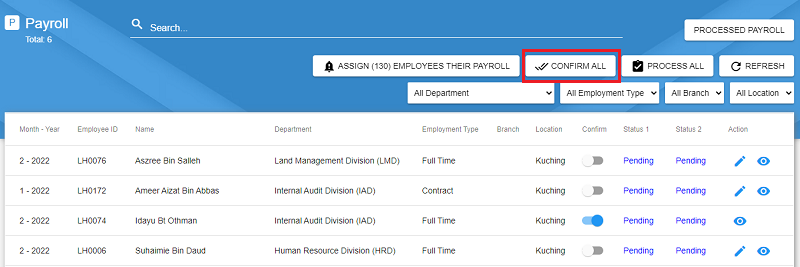
To confirm multiple payrolls at once, you may click on the Confirm All button as shown in the red rectangle below. It will confirm all the payrolls based on the filter results.
Responding to a Payroll
Once a payroll has been confirmed, the payroll approvers can start to respond the payroll. The function to respond payroll is not within this manager. To respond to a payroll, refer to Responding to Payroll (Approver).
Processing a Payroll
A payroll can only be processed after its status is approved. There are 2 statuses for a payroll, namely status 1 and status 2. Status 1 is the status of the payroll given by the level 1 payroll approver while status 2 is the status of the payroll given by the level 2 payroll approver.
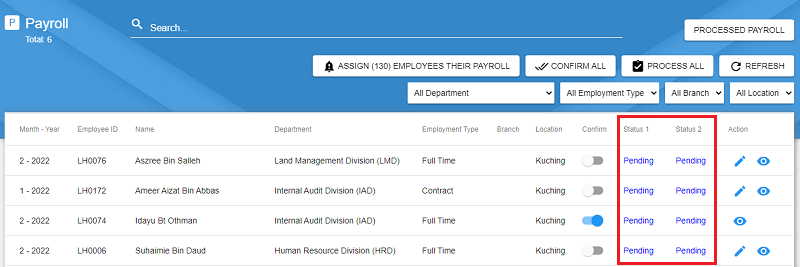
When both status 1 and status 2 are Approved, click on the Processed Payroll Manager and the payroll will automatically be changed to the next month's payroll in the Payroll Manager.

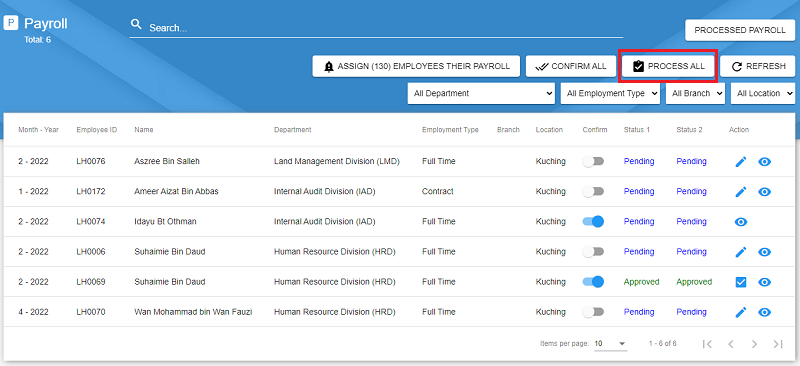
To process multiple payrolls at once, you may click on the Process All button as shown in the red rectangle below. It will process all the payrolls based on the filter results.
Processed Payroll Manager HR
The Processed Payroll Manager displays all the processed payrolls within the system. Processed payrolls are the payrolls the employees receive and their payslip is derived from the details in this payroll.

The table below gives a summary on the buttons available in the manager and their respective functions.
| Button | Function |
|---|---|
| Summary | Redirects to the Payroll Summary Manager |
| Revert All | Reverts all the Processed Payroll to Payroll(unprocessed) |
| Download All | Downloads all the payslips in a Zip archive after selecting the details and format |
| Send to All | Sends emails to all employees with their payslips as attachment |
| Refresh | Refreshes the data in the table |
The following table will list down in details, the functions of the icon buttons that you can see in the data table.
| Icon Button | Function |
|---|---|
| Opens up a popup to view the details of the processed payroll | |
| Reverts a processed payroll to payroll where the approval status is reset along with its confirmation state | |
Opens up a popup to select details to appear in the payslip and select the format. Once the Export button is clicked, it will download the employee's payslip |
|
| Sends the employee an email with their payslips attached |
Accessing Processed Payroll
Method 1 : Sidebar Menu
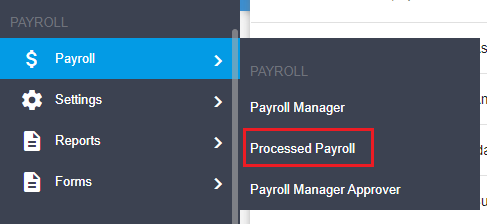
Go to the Sidebar menu, go to Payroll, hover over Payroll. Then click on Processed Payroll.
Method 2 : In Payroll Manager
In the Payroll Manager click on the Processed Payroll button on the top right.
Searching and Filtering Processed Payroll
To search for a processed payroll, click on the searchbar and type in the employee's name as shown in the image below.

To filter records, use the dropdown on the right side of the Manager. You can filter the data by any of the filters available.

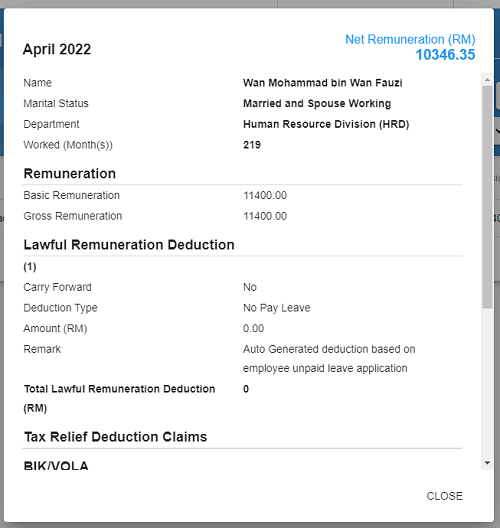
Viewing a Processed Payroll
To view the processed payroll details, click on the
Reverting a Processed Payroll
Reverting a processed payroll means to reset its approved and confirmed state. Once a processed payroll is reverted you will be able to see it in the Payroll Manager where you will have to repeat all the steps once more to process it.
To revert a processed payroll, click on the

A popup will appear to ask for your confirmation to revert the payroll. Click on Confirm to revert, else click on the Cancel.
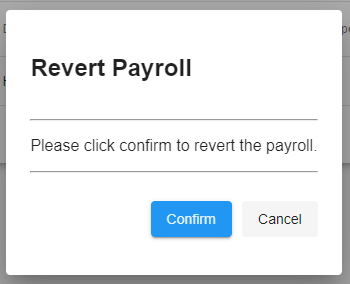
To revert multiple processed payrolls, click on the Revert All button as depicted in the image below. It will also prompt a popup to ask for your confirmation. Click Confirm to revert all the processed payrolls.

{warning} Before you click on the
Revert Allbutton, make sure the data is filtered correctly as it will revert all the processed payroll that is displayed in the data table
Downloading a Processed Payroll
To download the employee's payslip, click on the

A popup will appear for you to select which details to be displayed within the payslip and the format of the payslip. Check any checkboxes if you wish to display those details within the payslip.
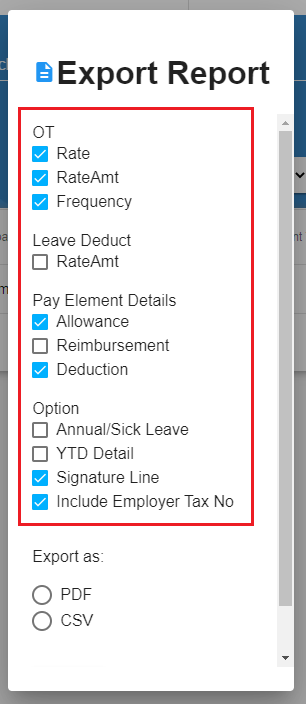
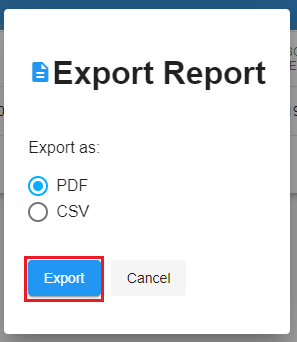
There are 2 formats available which are PDF and CSV. Select one of the formats then click Export.
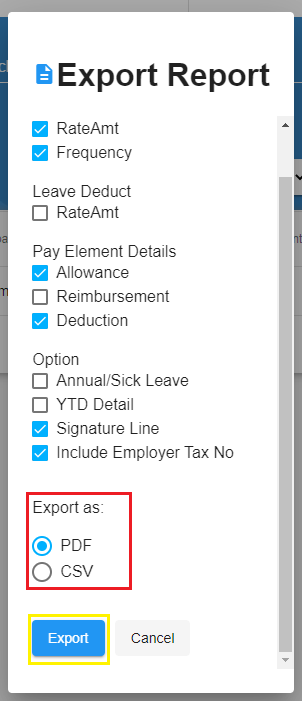
To download multiple payslips, click on the Download All button after filtering the processed payrolls. Then follow the steps like to above. The payslips will be downloaded in a zip archive of the chosen format.
Sending a Processed Payroll
To send a payslip to the employee by email, click on the

To send every employee their payslips by email, click on the Send to All button after filtering the processed payroll.

Payroll Summary
The Payroll Summary displays the summary of every processed payrolls within the selected month and year.
Accessing the Payroll Summary
Method 1 : In Processed Payroll
Select the month and year through the filter then click the Summary button in the Processed Payroll manager.

Method 2 : Through Sidebar and Payroll History
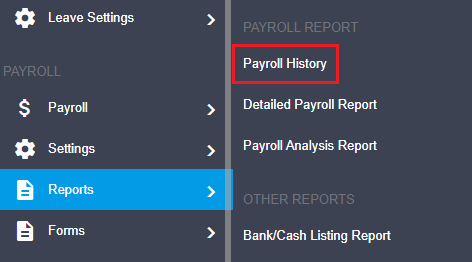
Click on Payroll History from the sidebar menu as shown in the image below.
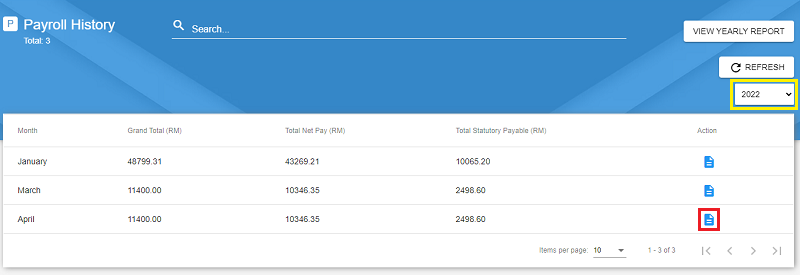
In Payroll History, select the year from the filter then click the
Searching and Filtering Payroll Summary
To search in the Payroll Summary, click on the searchbar then type in the employee's name.

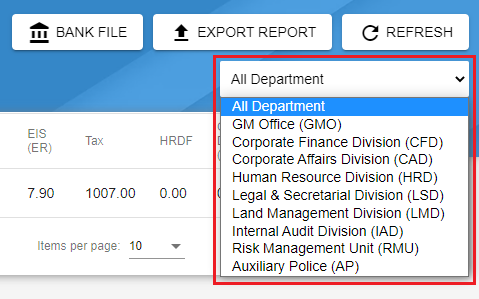
To filter through the records, use the dropdown on the right side of the Manager. You can filter the data by any of the filters available.
Viewing Specific Payroll
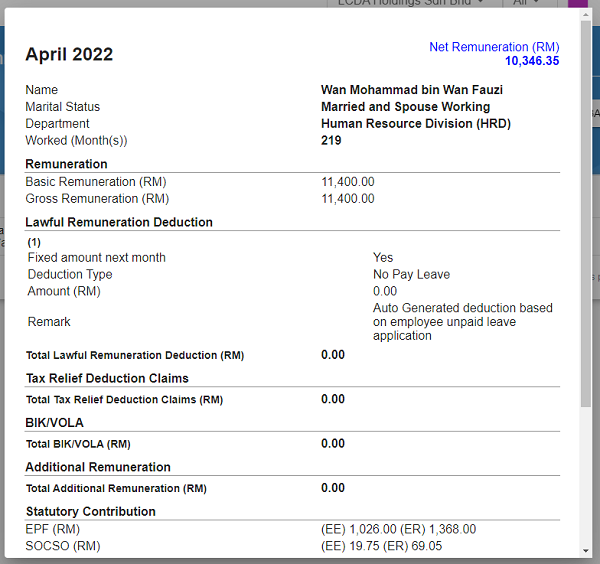
To view a specific employee's payroll, click on the

A popup will appear with the details of the employee's payroll.
Overall
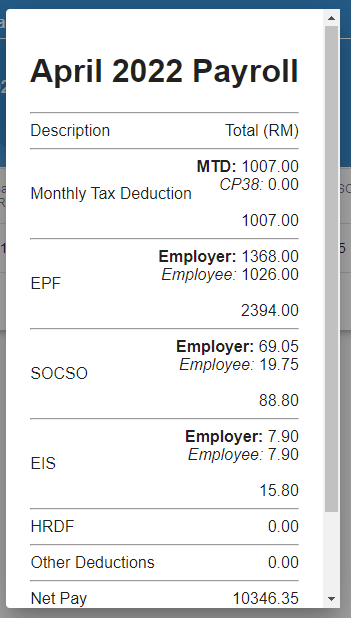
The Overall gives a summary of the total MTD, total statutory contributions (both employee and employer contributions) and total net pay for all employees with processed payroll for the selected month and year.
To view the Overall Summary, click on the Overall button on the top right of the Manager.

A popup will appear with all the summary details as shown in the image below.
Exporting Bank File
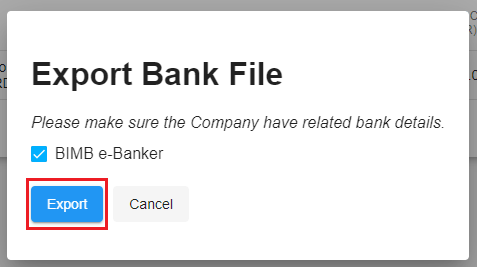
The Bank File is the document for the bank to transfer money. It includes details such as the bank account number and its respective amount of money to transfer to the account.
To export the Bank File, click on the Bank File button.

A popup will appear for you to choose the format for the bank file. The formats will depend on the company's bank details in the UMS. Select the format then click on Export.
Exporting Report
To export the Payroll Summary report, click on the Export Report button.

A popup will appear for you to choose the export format. There are 2 formats namely, PDF and CSV. Choose either one then click Export.
